Rechercher dans ce blog

Affichage des articles dont le libellé est autocollants. Afficher tous les articles

vendredi 16 novembre 2012

Nude & Black Half Moon Nail Art

Tout d'abord, un petit rappel: vous pouvez toujours participer à mon mini-giveaway pour gagner un très beau vernis holographique d'une marque coréenne (Face It) en allant faire un tour par ici :)

First of all, a little reminder: you can still enter my mini-giveaway to win a very nice holographic Korean nail polish from the Face It brand. Just visit this page :)

Notre nail art du jour est simple, chic, discret et parfait pour l'automne (je pense à vous dans l'Hémisphère Nord!). J'ai choisi de tester un de mes vernis OPI que je n'avais pas encore vraiment eu l'occasion de porter, et d'y ajouter des stickers que j'adore:

Our nail art of the day is simple, elegant and perfect for Fall (yes, a shout out to all the girls from the Northern Hemisphere!). I chose to wear one of my OPIs I hadn't really tested yet, with stickers that I really like:
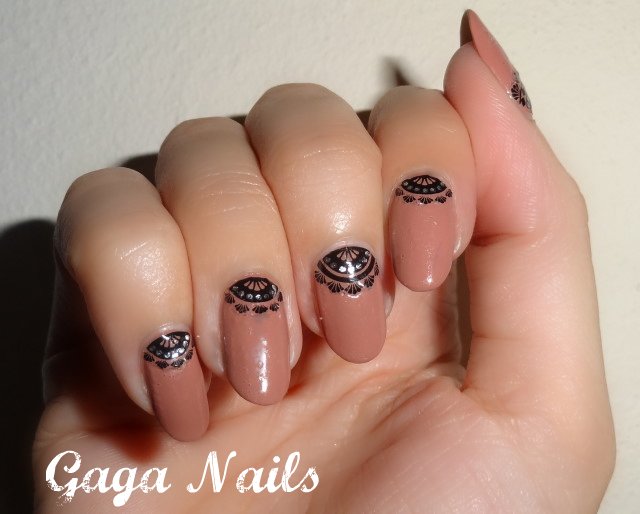

Pour la teinte, il s'agit de Barefoot in Barcelona de OPI, que je qualifierai de nude foncé, qui tire tantôt sur le vieux rose, tantôt sur le marron praline... Et pour les stickers en demie-lune, ils viennent de chez Pro Nails et c'est ma gentille copine Laure qui me les a offerts :) L'idée d'associer le noir et le nude avec des demies-lunes me vient du Wah Nails Book of Nail Art, avec ce design intitulé "Half-Moon", justement:

The shade is Barefoot in Barcelona, from OPI, and is a kind of dark nude, half pinkish and half brownish... Weird! As for the half-moon stickers, they're from Pro Nails, and were given to me as a present from my lovely friend Laure :) I had the idea of combining nude with black half-moons thanks to the Wah Nails Book of Nail Art, in which there was this design, intitled "Half-Moon":


Comme vous le voyez peut-être sur la photo ci-dessous, j'ai eu des petits soucis, d'abord de topcoat trop pâteux et trop vieux (ça fait des bulles), et ensuite de sticker qui s'est abîmé sur mon majeur gauche. Rien de grave, ça reste joli et ça va avec tout!

As you might notice on the following picture, I had some issues, first with my topcoat (too old) that went bubbly, and then with a sticker I smashed (on my middle finger). Nothing serious though, it still looks nice and goes with everything in terms of wardrobe!


Au début, j'ai également eu des difficultés à centrer les autocollants le long de mes cuticules, ils étaient souvent trop à gauche ou trop à droite. Après, j'ai pris un repère et hop! Plus de stickers de travers.

At first, I had troubles getting the stickers right in the middle of my nail bed, they were either too left-sided or right-sided. All you need to do in that case is to pick a mark as a guideline and the problem's solved!


Voilà, je vous laisse déjà avec d'autres clichés, à bientôt!

Alright, that's it for today, see you soon!


lundi 5 novembre 2012

US Elections Nail Art

Le monde entier a les yeux rivés sur l'Amérique car demain, ce sont les élections présidentielles. Les Américains se choisiront (ou non!) un nouveau président. J'ai pensé que pour l'occasion, mes nouveaux nail foils (des décors adhésifs intégraux pour ongles) de chez Peggy Sage seraient parfaits! En effet, j'ai récemment voulu tester ces stickers et j'ai choisi un modèle très "star", qui m'a tout de suite fait penser à la fameuse bannière étoilée.

The whole world is focused on the US right now because tomorrow, the Americans are going to vote for their presidential elections. They might or might not choose a brand new president, so I thought I should come up with something for the occasion. And actually, my brand new nail foils from Peggy Sage are perfect for that! They are starry enough to remind me of the Star Spangled Banner.


J'avoue que personnellement, j'ai une préférence pour Barack Obama, comme tous les Européens je pense... Donc, je disais, pour compléter ma bannière étoilée, il me fallait aussi symboliser les bandes rouges et blanches du drapeau américain. J'ai choisi cette fois-ci de poser des strass rouges en ligne sur une base de vernis blanc (Sephora by OPI White Hot). J'avais déjà dessiné un drapeau US pour un autre nail art, vous pouvez aller voir par ici si ça vous intéresse.

I admit that personally, my heart goes to Barack Obama, like all Europeans I guess... But let's focus on this banner. I needed to add the red and white stripes, so I applied red rhinestones all in line over a white base (Sephora by OPI White Hot). I drew a complete American flag once for another nail art, check it out here if you're curious.


Sur mon autre main, je n'ai pas fait de variante car je n'avais tout simplement plus de strass rouges! Et oui, après en avoir posé 19, il ne m'en restait plus qu'un... (la Saint Valentin est passé par là il y a longtemps!). J'ai donc opté pour le total look foil et je trouve ça vraiment très sympa (et c'est rare que tous mes doigts soient identiques sur une même main donc j'en profite!).

On my other hand, I didn't make an accent ring finger because I had no red rhinestones left for that! You know, after applying 19, I just had one left... (Valentine's Day took its toll on my red rhinestones stash!) I went for the whole foil look then, and I really like it (my fingers almost never look all the same on one hand, so I enjoy it while I can!).


Pour poser les autocollants (ou foils), il faut d'abord appliquer une base transparente, puis les décoller délicatement et les ajuster à l'ongle (j'ai coupé les bords s'ils étaient trop larges), puis bien étirer et lisser pour ne pas créer de plis sur les bords (plus facile à dire qu'à faire, car j'en ai quelques uns...). Ensuite, couper le bord libre du foil et le limer pour l'ajuster à votre ongle. Finir avec une couche de topcoat, plutôt généreuse. Certains n'étaient pas assez larges, alors j'ai ajouté un peu de noir avec un liner, pour remplir un peu plus les bords. Ca ne se voit pas car la base est noire, donc pas de problème.

To apply the foils, start with a transparent base coat, then delicately remove the sticker and try to adjust it to your nail. You can cut the edges if it's too large, and then stretch it and smooth it out on you nail, so as not to create creases on the edges. Cut the top unnecessary part of the foil and file it to adjust it completely to your nail. Finish with a generous topcoat. If some foils are not large enough, add a little line of black with a liner, since the foil base is black, it won't show.


Voilà, j'ai à peu près fait le tour, je vous laisse et vous promets que cette semaine, je posterai enfin l'article du giveaway dont je vous ai parlé auparavant :)

That's all for today, see you really soon with the giveaway I promised you a short time ago :)


avec flash / with flash