Once in a while I like to treat myself with a nice pedicure that involves more than just a plain color on my toes. But I don't want to spend too much time on it (yes, painting toenails uncomfortable, especially for the back). So I did this sparkly pedi :
Rechercher dans ce blog
Affichage des articles dont le libellé est rose. Afficher tous les articles
dimanche 18 septembre 2016
Pedicure bling bling
De temps en temps j'aime bien porter une pedicure qui change un peu de l'ordinaire, sans pour autant y passer des heures (le dos courbé, non merci!). Voici donc une pedicure un peu bling bling à base de vieux rose et de doré.
J'ai utilisé des strass Swarowski sur les petits orteils, et sur le gros des strass rose et argent, et des petites billes Caviar de chez Ciaté. Le vernis glitter doré vient de chez Mavala, le rose de chez Kiko et le crème de chez OPI.
mardi 8 mars 2016
Nails of the Week: Molang Nail Art
Mon fils adore ce dessin animé fraîchement débarqué sur Piwi + et remis au goût du jour par une équipe française. Au début, il n'arrivait pas à dire Molang, donc il disait "Poussin Jaune et Poussin Blanc" :D
Voici donc Molang et Piu Piu!
lundi 8 février 2016
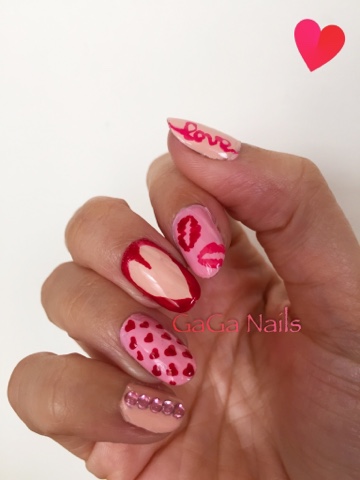
Nail Art Rouge et Rose de St Valentin / Red and Pink Valentine's Day Nail Art
Du rouge, du rose, des cœurs, des bisous et du bling bling: c'est ma combo gagnante pour cette St Valentin. J'ai réalisé un nail art à l'aide de mes stylos Nails Supreme, et c'est plutôt sympa:
J'adore la combo manucure girly + bague à paillettes... Et vous?
Red, pink, hearts, kisses and a touch of bling: that's my go-to mani for V-Day. I used Nails Supreme pens to draw the details and it's pretty cool:
Les vernis de base sont Orly Prelude to a Kiss et Color Club Cool Breeze.
Base Colors mentioned right above.
Love the girly mani + the glitter ring :)
mercredi 14 octobre 2015
Easy Floral Nail Art / Manucure Florale Facile
Pour ce nouveau nail art j'ai voulu premièrement réaliser un design facile (en un minimum de temps) et deuxièmement l'assortir à ma montre, une montre slap de chez Bill's Technologies. J'ai donc fait des roses roses et des feuilles vertes au pinceau.
For this nail art, I wanted two things: first an easy and quick design, and second a design that would match my watch. It's a slap watch from Bill's Technologies. I therefore painted pink roses and Green leaves with a brush.
J'ai utilisé 2 teintes de rose et 2 de vert différentes, et j'ai aussi ajouté des touches de blanc au cœur des roses. Le résultat final est plutôt réussi, même si mes roses ne sont pas bien définies. Je porte encore ce nail art une semaine après sans qu'il ne se soit écaillé ou presque...
I used 2 different pinks and 2 different greens and added white in the core of the roses. I'm still wearing this mani 1 week after and it hasn't chipped a bit (well, almost not).
mardi 7 juillet 2015
Watermelon Nail Art for Summer / Manucure d'Eté: la Pastèque
Après une petite pause due à un manque d'inspiration (et de temps!), me revoilà avec un Nail art vitaminé qui sent bon l'été. Je me suis laissée tenter par des petites pastèques que j'ai décliné de plusieurs façons. Voici le résultat:
After being MIA for a month or so (I didn't have much inspiration nor time to do what I wanted), here I am again, back with the perfect summer mani: fresh little watermelons! Look how cute they are:
J'ai utilisé de la Fimo que j'avais en canne, et comme je n'ai pas réussi à faire des tranches régulières, j'ai coupé des petites parts, comme pour une pizza :) Merci à ma copine Cheïma pour m'avoir offert ces cannes, ça m'a donné des idées pour la suite ;)
I used Fimo cane for the middle finger, and since I couldn't cut regular slices, I arranged them into small bits, and it worked just fine :) I think I'm gonna use more Fimo in the future because it looks funky on my nails!
Les vernis utilisés sont China Glaze Under the Boardwalk, OPI That's Hularious et Impala Palmeira Tropical pour le rose et les 2 verts, respectivement.
Polishes used are China Glaze Under the Boardwalk, OPI That's Hularious and Impala Palmeira Tropical for the neon pink and both greens respectively.
C'est en tout cas une manucure très facile et assez rapide à réaliser, alors n'hésitez pas! Vous ferez sensation autour de la piscine ou au bord de la plage :)
Anyways, it's a very easy and pretty quick mani to achieve, so go for it! You'll definitely make a statement with those lovelies :)
lundi 15 juin 2015
Kate Spade For The Birds Nail Art
Aujourd'hui, voici un Nail art inspiré de la célèbre marque new-yorkaise Kate Spade, que j'adore. J'ai acheté récemment une pochette et des boucles d'oreilles qui reprennent le même design: un joli toucan. Le modèle des boucles se nomme For The Birds, d'où le titre de cet article. Et voilà le résultat sur mes ongles :
Today, here's a nail art inspired by Kate Spade (I love that New York brand). I recently bought a set of earrings and a matching pouch, which are both similar in design since they display or represent a cute toucan. The name of the earrings is For The Birds, hence the title of this post. Take a look at my Nails:
J'ai repris le toucan comme élément central et ajouté des rayures avec du striping tape gris métallisé foncé. Puis j'ai terminé par 2 couleurs qui allaient bien ensemble, le vert d'eau et le fuschia, qu'on peut d'ailleurs retrouver dans le design du toucan.
I used the toucan as the centerpiece of my design and then added stripes with a dark metallic grey striping tape, and finished with two bright colors, mint and neon pink, because it was a nice combo and they were both partly used for the toucan.
Tout est dessiné à la main avec un pinceau Nail art et un stylo Nail art noir.
Everything is freehanded using a brush or a black Nail art pen.
Avec la boucle d'oreille:
Here you can compare with the earring:
Libellés :
Bird,
black,
blanc,
brush,
inspiration,
Kate Spade,
mint,
nail art,
nail polish,
noir,
oiseau,
pinceau,
pink,
rayures,
rose,
stripes,
striping tape,
toucan,
vernis,
white
lundi 6 avril 2015
Nail Art de Pâques / Easter Nail Art
Un peu de douceur et de pastel avec ce Nail art aux couleurs de Pâques: jaune poussin, vert d'eau et Lilas agrémenté de paillettes ou craquelé, avec un rendu matte.
mardi 3 septembre 2013
Back to School (and back on the blog!) Nail Art / Nail Art de Rentrée featuring Cheïma
Hé bien, en voilà une surprise! Et oui, après 5 mois de silence radio, me revoilà! Mais où étais-je passée pendant tout ce temps, hein? Ben j'étais là (et un peu en vacances aussi), mais pas très disponible car je vais bientôt être maman :) En effet, depuis le mois de février, mes posts ce sont faits rares (puis absents) car j'ai été très malade pendant cette grossesse, et surtout très fatiguée. Le plus dur étant passé (et les vacances aussi), je reprends donc du service tout en sachant que je ne pourrai pas consacrer beaucoup de temps à ce blog dorénavant, enfin surtout dès que bébé sera là (c'est à dire dans un mois environ!). J'essaierai en tout cas de continuer à partager mes nails arts originaux, ici et surtout sur ma page Facebook. Je profite de cette rentrée pour faire mon retour et vous présenter un nail art de circonstance, réalisé sur les mains de ma copine Cheïma.
Now, that's a surprise, right? After 5 months of being MIA, here I am again! Where the hell have I been all this time? Well, I was here (and on vacation also sometimes) but I wasn't really available for blogging, because I'm expecting :) Indeed, since last February, I've been really sick and exhausted because of the pregnancy, and therefore I haven't posted much (or at all). Now that I'm better (and back from vacation), I decided to blog again, knowing that from now on (and especially from the birth on), it will be hard for me to post often as I will have less time for blogging. But I'll keep sharing my nail arts, here and on my Facebook page. Since I'm back, I decided to start with a back to school mani that I did for my friend Cheïma.
C'est un design assez simple que l'on trouve très facilement en tutoriel sur Youtube, et qui représente les deux bouts d'un crayon à papier, une copie d'élève, une règle de maths graduée et une pomme (je ne sais pas pourquoi la pomme est un élément de la rentrée aux USA...). Les couleurs dont vous aurez besoin sont les suivantes: jaune, blanc, rose, beige, noir, rouge, argenté, un vernis "striping" bleu ciel et un orange. Enfin, il vous faudra une goutte de vert et de marron pour la pomme.
It's a pretty simple design that you can find on Youtube if you're looking for a tutorial, representing both tips of a pencil, a lined sheet of paper, a graduated math ruler and an apple (can you tell me why there's always an apple in back to school tutorials?). You won't need many colors, just yellow, white, pink, beige, black, red, silver, a light blue striping polish and an orange one, and finally a little tiny bit of green and brown for the apple.
Je ne vous présenterai pas son autre main car bien sûr, Cheïma a choisi un design complètement différent, que je vous montrerai une autre fois :) En tout cas, ce nail art très simple a réaliser et qui ne demande que peu de matériel (un pinceau fin et/ou des vernis "striping") a fait mouche auprès de ses élèves (et de ses collègues)!
I won't show you her other hand because my friend chose to wear a completely different design (that would be her!) that I'll show you some other time :) Anyway, this very simple nail art can be done with very few tools (a thin brush and/or striping polishes) and it really blew her pupils and her collegues away!
Voici pour terminer une légère variante de ce nail art, toujours sur Cheïma, car en fait cela fait deux rentrées qu'elle me confie ses ongles! Elle a donc voulu le même design, à quelques détails près. Voilà, à bientôt pour d'autres nail arts!
Here's to finish the same nail art but with a slight change, as my friend trusted me with her back to school mani 2 years in a row! She wears the same design, with very small changes. See you soon for other nail arts!
Now, that's a surprise, right? After 5 months of being MIA, here I am again! Where the hell have I been all this time? Well, I was here (and on vacation also sometimes) but I wasn't really available for blogging, because I'm expecting :) Indeed, since last February, I've been really sick and exhausted because of the pregnancy, and therefore I haven't posted much (or at all). Now that I'm better (and back from vacation), I decided to blog again, knowing that from now on (and especially from the birth on), it will be hard for me to post often as I will have less time for blogging. But I'll keep sharing my nail arts, here and on my Facebook page. Since I'm back, I decided to start with a back to school mani that I did for my friend Cheïma.
C'est un design assez simple que l'on trouve très facilement en tutoriel sur Youtube, et qui représente les deux bouts d'un crayon à papier, une copie d'élève, une règle de maths graduée et une pomme (je ne sais pas pourquoi la pomme est un élément de la rentrée aux USA...). Les couleurs dont vous aurez besoin sont les suivantes: jaune, blanc, rose, beige, noir, rouge, argenté, un vernis "striping" bleu ciel et un orange. Enfin, il vous faudra une goutte de vert et de marron pour la pomme.
It's a pretty simple design that you can find on Youtube if you're looking for a tutorial, representing both tips of a pencil, a lined sheet of paper, a graduated math ruler and an apple (can you tell me why there's always an apple in back to school tutorials?). You won't need many colors, just yellow, white, pink, beige, black, red, silver, a light blue striping polish and an orange one, and finally a little tiny bit of green and brown for the apple.
Je ne vous présenterai pas son autre main car bien sûr, Cheïma a choisi un design complètement différent, que je vous montrerai une autre fois :) En tout cas, ce nail art très simple a réaliser et qui ne demande que peu de matériel (un pinceau fin et/ou des vernis "striping") a fait mouche auprès de ses élèves (et de ses collègues)!
I won't show you her other hand because my friend chose to wear a completely different design (that would be her!) that I'll show you some other time :) Anyway, this very simple nail art can be done with very few tools (a thin brush and/or striping polishes) and it really blew her pupils and her collegues away!
Voici pour terminer une légère variante de ce nail art, toujours sur Cheïma, car en fait cela fait deux rentrées qu'elle me confie ses ongles! Elle a donc voulu le même design, à quelques détails près. Voilà, à bientôt pour d'autres nail arts!
Here's to finish the same nail art but with a slight change, as my friend trusted me with her back to school mani 2 years in a row! She wears the same design, with very small changes. See you soon for other nail arts!
mardi 22 janvier 2013
OPI Black Spotted Easy Gradient Nail Art
Et voilà, j'ai décidé de retester ce fameux vernis OPI qui se négocie maintenant presque à prix d'or, le célèbre Black Spotted (dont j'avais fais la présentation ici). Cette fois, j'ai voulu l'essayer avec des couleurs flashy, un peu poussée je l'avoue par cette manucure de Cutepolish, qui explique en fait comment arriver au même résultat (ce visuel "troué") sans avoir ce précieux vernis. Enfin bref, voici mon résultat final (qui est moins bon que celui de Cutepolish, je dois bien l'avouer):
That's it! I've decided to try again my precious OPI Black Spotted, which is now really complicated to find if you haven't had to chance to stumble upon it. I first introduced you to that polish here. This time, I wanted to try it upon bright colors, probably because I really liked Cutepolish's video, explaining how to get the Spotted look without using the so-called polish. Anyways, here's how it turned out on me (Cutepolish's version is still way better!) :
J'ai commencé par faire un dégradé du rose au mauve, mais pas un truc à l'éponge qui prend des heures, non, j'ai voulu cette fois la jouer simple. J'ai donc d'abord appliqué une couche de vernis blanc (pour faire ressortir les couleurs), puis une fois sec, j'ai aligné mes couleurs horizontalement, du rose fluo au mauve foncé, directement avec les pinceaux des vernis. J'ai terminé par une couche de topcoat pour être sûre que la texture serait la même sur toute la surface de mon ongle.
I started first with a pink to purple gradient, but not something long and complicated with a sponge, no, I really kept it simple. Therefore, I began with a white base coat (to make the colors pop out), and then once dry, I aligned my colors horizontally, from neon pink to dark purple, directly with the polish brushes. I finished with topcoat to be sure that the surface of my nail would be completely even and the texture alike.
Le rendu jusqu'à présent est très sympa, j'aurai volontiers pu porter cette manucure telle quelle et ça m'aurait bien plu! Voici les vernis utilisés:
-Sinful Colors 24/7
-Yves Rocher Rose Sorbet
-Kiss Brush On Nail Art Soft Purple
-Orly Charged Up
The result looked really good so far, I could have worn this mani just like this and I would have loved it! Polishes used listed above.
Voici la même photo prise en extérieur et sans flash (la précédente étant prise avec flash), juste pour le fun et parce que j'adore cette manucure avec ce petit cupcake tout mignon! Je ne vous présente pas ma main gauche, car j'ai encore eu de la casse!
Above is basically the same picture but taken outside and without flash (previous pic with flash), just because I love this combo (bright mani + cute cupcake)! I won't show you my left hand because another nail broke!
Le lendemain, j'ai appliqué le vernis OPI, en couche très très fine, en faisant bien attention de ne pas repasser deux fois au même endroit. Le rendu est quand même très différent de ce à quoi on s'attend (on imagine un genre de "vernis gruyère"), car les "trous" ne sont pas toujours bien ronds et l'aspect fait un peu huileux. J'ai terminé par une ultime couche de topcoat (j'ai testé mon nouveau China Glaze Fast Forward), et voilà!
On the next day, I applied the OPI polish, in a very very thin coat, without going over the same spot twice. The result is really different from what we expect (we imagine some kind of "gruyere cheese polish"), as the spots ar not always round and the overall aspect looks oily. I finished with topcoat (China Glaze Fast Forward), and that's it!
Mon avis reste toujours assez partagé sur ce fameux Black Spotted, je pense qu'il faudrait le tester sur d'autres types de vernis (pailletés ou holographiques) pour vraiment voir son potentiel. Quand au topcoat China Glaze, il sèche très vite comme le Sèche Vite, mais j'ai l'impression qu'il s'écaille très vite aussi! Affaire à suivre... Voilà, je vous laisse, mais je vous reparle très vite d'une très très bonne surprise! A bientôt ;)
I'm still quite reserved about Black Spotted, I think I should test it over holo and glitter polishes to make up my mind. As for China Glaze Fast Forward, it's a really fast drying topcoat for sure, but also very fast chipping! Or so it seems... Alright, that's it for today, but I'll come back quickly with a very nice surprise! See you soon ;)
That's it! I've decided to try again my precious OPI Black Spotted, which is now really complicated to find if you haven't had to chance to stumble upon it. I first introduced you to that polish here. This time, I wanted to try it upon bright colors, probably because I really liked Cutepolish's video, explaining how to get the Spotted look without using the so-called polish. Anyways, here's how it turned out on me (Cutepolish's version is still way better!) :
J'ai commencé par faire un dégradé du rose au mauve, mais pas un truc à l'éponge qui prend des heures, non, j'ai voulu cette fois la jouer simple. J'ai donc d'abord appliqué une couche de vernis blanc (pour faire ressortir les couleurs), puis une fois sec, j'ai aligné mes couleurs horizontalement, du rose fluo au mauve foncé, directement avec les pinceaux des vernis. J'ai terminé par une couche de topcoat pour être sûre que la texture serait la même sur toute la surface de mon ongle.
I started first with a pink to purple gradient, but not something long and complicated with a sponge, no, I really kept it simple. Therefore, I began with a white base coat (to make the colors pop out), and then once dry, I aligned my colors horizontally, from neon pink to dark purple, directly with the polish brushes. I finished with topcoat to be sure that the surface of my nail would be completely even and the texture alike.
Le rendu jusqu'à présent est très sympa, j'aurai volontiers pu porter cette manucure telle quelle et ça m'aurait bien plu! Voici les vernis utilisés:
-Sinful Colors 24/7
-Yves Rocher Rose Sorbet
-Kiss Brush On Nail Art Soft Purple
-Orly Charged Up
The result looked really good so far, I could have worn this mani just like this and I would have loved it! Polishes used listed above.
Voici la même photo prise en extérieur et sans flash (la précédente étant prise avec flash), juste pour le fun et parce que j'adore cette manucure avec ce petit cupcake tout mignon! Je ne vous présente pas ma main gauche, car j'ai encore eu de la casse!
Above is basically the same picture but taken outside and without flash (previous pic with flash), just because I love this combo (bright mani + cute cupcake)! I won't show you my left hand because another nail broke!
Le lendemain, j'ai appliqué le vernis OPI, en couche très très fine, en faisant bien attention de ne pas repasser deux fois au même endroit. Le rendu est quand même très différent de ce à quoi on s'attend (on imagine un genre de "vernis gruyère"), car les "trous" ne sont pas toujours bien ronds et l'aspect fait un peu huileux. J'ai terminé par une ultime couche de topcoat (j'ai testé mon nouveau China Glaze Fast Forward), et voilà!
On the next day, I applied the OPI polish, in a very very thin coat, without going over the same spot twice. The result is really different from what we expect (we imagine some kind of "gruyere cheese polish"), as the spots ar not always round and the overall aspect looks oily. I finished with topcoat (China Glaze Fast Forward), and that's it!
Mon avis reste toujours assez partagé sur ce fameux Black Spotted, je pense qu'il faudrait le tester sur d'autres types de vernis (pailletés ou holographiques) pour vraiment voir son potentiel. Quand au topcoat China Glaze, il sèche très vite comme le Sèche Vite, mais j'ai l'impression qu'il s'écaille très vite aussi! Affaire à suivre... Voilà, je vous laisse, mais je vous reparle très vite d'une très très bonne surprise! A bientôt ;)
I'm still quite reserved about Black Spotted, I think I should test it over holo and glitter polishes to make up my mind. As for China Glaze Fast Forward, it's a really fast drying topcoat for sure, but also very fast chipping! Or so it seems... Alright, that's it for today, but I'll come back quickly with a very nice surprise! See you soon ;)
samedi 22 septembre 2012
Nail Art Mosaïque / Stained Glass Pedi à la Wah Nails
Aujourd'hui, voici une pédicure hyper vitaminée que j'aurais bien réalisée sur mes mains (mais mes ongles étaient en "pause soins"!). Je me suis inspirée d'un nail art intitulé "Stained Glass" et présenté dans le Wah Nails Book of Nail Art. Voyez plutôt:
Today, here's a pedicure I wish I made on my hands (but my nails were in a "no-polish" period!). I was inspired by the Stained Glass nail art in the Wah Nails Book of Nail Art. Here's what it looks like:
J'ai utilisé des vernis fluos ou bien des couleurs "flashy", 6 au total:
-du rose (24/7 de Sinful Colors)
-du violet (Charged Up de Orly)
-du jaune (Smiles de Impala)
-du bleu (It's Up to Blue de Orly)
-du vert (Ivy League de Sally Hansen)
-du orange (Gold Orange de Nivea)
I used mostly neon polishes, and also very bright ones. List of the 6 polishes used above.
Pour faire ressortir les couleurs, j'ai d'abord commencé par une couche de vernis blanc qui a servi de base. Une fois qu'elle était sèche, j'ai appliqué les autres vernis directement avec leurs pinceaux respectifs, en dessinant des taches plus ou moins rondes ou carrées. Une fois que tout est bien sec, il suffit d'en délimiter les contours avec un nail art pen noir et voilà!
First apply a white base coat to make the colors stand out. Then draw splotches of colors trying to give them a round or squarish shape. Allow to dry and outline everything with a black nail art pen. And that's it!
Les deux premières photos sont prises avec flash, celle ci-dessus et la suivante à la lumière du soleil. Vous pourrez remarquer qu'après quelques jours, on constate un phénomène bizarre sur le gros orteil: une craquelure au niveau du bord droit. C'est un "effet secondaire" assez fréquent avec le topcoat Seche Vite, mais je ne l'avais encore jamais "vécu"... :(
First couple pictures of the post taken with flash, next 2 without, in the sunlight. You can notice in the picture above that I had a shrinkage on my big toe due to Seche Vite... I knew it could happen, but this is a first for me.
Voilà, une dernière photo bonus pour la route, et à bientôt!
Here's a last bonus picture to make you wait until the next post!
Today, here's a pedicure I wish I made on my hands (but my nails were in a "no-polish" period!). I was inspired by the Stained Glass nail art in the Wah Nails Book of Nail Art. Here's what it looks like:
J'ai utilisé des vernis fluos ou bien des couleurs "flashy", 6 au total:
-du rose (24/7 de Sinful Colors)
-du violet (Charged Up de Orly)
-du jaune (Smiles de Impala)
-du bleu (It's Up to Blue de Orly)
-du vert (Ivy League de Sally Hansen)
-du orange (Gold Orange de Nivea)
I used mostly neon polishes, and also very bright ones. List of the 6 polishes used above.
Pour faire ressortir les couleurs, j'ai d'abord commencé par une couche de vernis blanc qui a servi de base. Une fois qu'elle était sèche, j'ai appliqué les autres vernis directement avec leurs pinceaux respectifs, en dessinant des taches plus ou moins rondes ou carrées. Une fois que tout est bien sec, il suffit d'en délimiter les contours avec un nail art pen noir et voilà!
First apply a white base coat to make the colors stand out. Then draw splotches of colors trying to give them a round or squarish shape. Allow to dry and outline everything with a black nail art pen. And that's it!
Les deux premières photos sont prises avec flash, celle ci-dessus et la suivante à la lumière du soleil. Vous pourrez remarquer qu'après quelques jours, on constate un phénomène bizarre sur le gros orteil: une craquelure au niveau du bord droit. C'est un "effet secondaire" assez fréquent avec le topcoat Seche Vite, mais je ne l'avais encore jamais "vécu"... :(
First couple pictures of the post taken with flash, next 2 without, in the sunlight. You can notice in the picture above that I had a shrinkage on my big toe due to Seche Vite... I knew it could happen, but this is a first for me.
Voilà, une dernière photo bonus pour la route, et à bientôt!
Here's a last bonus picture to make you wait until the next post!
mardi 31 juillet 2012
En Vacances! / On Vacation !
Pas beaucoup d'activité sur le blog depuis un mois car je suis actuellement en vacances, et j'en profite bien!
Rendez-vous à la rentrée en septembre pour de nouveaux nail arts!
The blog is currently inactive as I am on vacation at the moment, and I make the most of my break!
See you back in September for brand new nail arts!
Rendez-vous à la rentrée en septembre pour de nouveaux nail arts!
The blog is currently inactive as I am on vacation at the moment, and I make the most of my break!
See you back in September for brand new nail arts!
mercredi 13 juin 2012
Wah Nails Roses Nail Art
Aujourd'hui, je vous présente un nail art directement tiré de ma nouvelle Bible, The Wah Nails Book of Nail Art. Pour ce premier test, j'ai choisi de faire leurs petites roses vintage, que je trouve vraiment très sympa. Jugez par vous-mêmes:
Today, here's the first nail art I made which is directly taken from The Wah Nails Book of Nail Art. I chose to go for their sweet little vintage roses. See for yourself:
Comme base, j'ai utilisé un vernis turquoise, le Bourjois Blue Model, sauf pour l'annulaire, pour lequel j'ai d'abord appliqué une couche de blanc (OPI Alpine Snow) et une couche d'un vernis un peu spécial, le Ludurana Camboriu-Sc. C'est un vernis qui est supposé changer de couleur au soleil, et passer du transparent au bleu clair. Le truc, c'est qu'il n'y a pas beaucoup de soleil direct ces temps-ci, alors je n'ai pas encore eu l'occasion de le voir changer...
I used a teal French polish as a base (Bourjois Blue Model), except for my ring finger, on which I applied a white polish (OPI Alpine Snow) and a Brasilian polish on top of it, Ludurana Camboriu-Sc. This particular polish is supposed to change color with the sun, and become light blue. But the thing is, there's no direct sun these last few days, so I haven't seen the change yet.
Pour les roses, j'ai utilisé un rose clair (Bourjois 1 seconde rose), un rose foncé (Impala L'Amore) et un vernis lilas (Impala Zaz) posé par dessus du blanc, pour qu'il ressorte bien. Pour les feuilles, j'ai choisi le Colorama Verde Palmeiro. Tout a été peint au pinceau fin.
To draw the little roses, I used a baby pink polish (Bourjois 1 seconde rose), a dark pink (Impala L'Amore), and a lilac polish (Impala Zaz), the latter applied over white to make it stand out. As for the little leaves, I chose Colorama Verde Palmeiro. It was all done with a thin nail art brush.
Laissez sécher tout ça, et une fois bien sec, vous pourrez alors dessiner les contours des roses à l'aide d'un stylo nail art noir. Laissez de nouveau sécher, et terminez avec votre topcoat favori. Et voilà, très facile!
Allow to dry, then outline everything with a nail art pen. Once it is dry again, apply your favorite top coat, and you're done! Easy, right?
Toutes ces étapes sont bien expliquées (en anglais!) dans le livre de Wah Nails, avec des petits conseils quant au choix des couleurs. Ils proposent une base blanche, mais je trouve que le turquoise ajoute un plus à la touche "vintage" de ce nail art.
All these steps are detailed in the Wah nails book, with tips to choose your colors properly. It is recommended to use a white base, but I like mine better, as the teal enhances the "vintage touch" of this mani.
Voilà, je vous laisse avec des photos bonus!
Here are a few bonus pictures, see you soon :)
Today, here's the first nail art I made which is directly taken from The Wah Nails Book of Nail Art. I chose to go for their sweet little vintage roses. See for yourself:
Comme base, j'ai utilisé un vernis turquoise, le Bourjois Blue Model, sauf pour l'annulaire, pour lequel j'ai d'abord appliqué une couche de blanc (OPI Alpine Snow) et une couche d'un vernis un peu spécial, le Ludurana Camboriu-Sc. C'est un vernis qui est supposé changer de couleur au soleil, et passer du transparent au bleu clair. Le truc, c'est qu'il n'y a pas beaucoup de soleil direct ces temps-ci, alors je n'ai pas encore eu l'occasion de le voir changer...
I used a teal French polish as a base (Bourjois Blue Model), except for my ring finger, on which I applied a white polish (OPI Alpine Snow) and a Brasilian polish on top of it, Ludurana Camboriu-Sc. This particular polish is supposed to change color with the sun, and become light blue. But the thing is, there's no direct sun these last few days, so I haven't seen the change yet.
Pour les roses, j'ai utilisé un rose clair (Bourjois 1 seconde rose), un rose foncé (Impala L'Amore) et un vernis lilas (Impala Zaz) posé par dessus du blanc, pour qu'il ressorte bien. Pour les feuilles, j'ai choisi le Colorama Verde Palmeiro. Tout a été peint au pinceau fin.
To draw the little roses, I used a baby pink polish (Bourjois 1 seconde rose), a dark pink (Impala L'Amore), and a lilac polish (Impala Zaz), the latter applied over white to make it stand out. As for the little leaves, I chose Colorama Verde Palmeiro. It was all done with a thin nail art brush.
Laissez sécher tout ça, et une fois bien sec, vous pourrez alors dessiner les contours des roses à l'aide d'un stylo nail art noir. Laissez de nouveau sécher, et terminez avec votre topcoat favori. Et voilà, très facile!
Allow to dry, then outline everything with a nail art pen. Once it is dry again, apply your favorite top coat, and you're done! Easy, right?
Toutes ces étapes sont bien expliquées (en anglais!) dans le livre de Wah Nails, avec des petits conseils quant au choix des couleurs. Ils proposent une base blanche, mais je trouve que le turquoise ajoute un plus à la touche "vintage" de ce nail art.
All these steps are detailed in the Wah nails book, with tips to choose your colors properly. It is recommended to use a white base, but I like mine better, as the teal enhances the "vintage touch" of this mani.
Voilà, je vous laisse avec des photos bonus!
Here are a few bonus pictures, see you soon :)
Inscription à :
Articles (Atom)